

GENERAL SUPPLY LIST
|
|
|
PREPARATION
CLEAN THE PORCELAIN ORNAMENT
Remove the metal hanger from the ornament. Spray denatured alcohol or glass cleaner onto the ornament and wipe it off with a clean lint free cloth. Old cotton sheets, cotton t-shirts and industrial strength blue paper towels are all good lint free choices for cleaning porcelain.
TRANSFER THE DESIGN
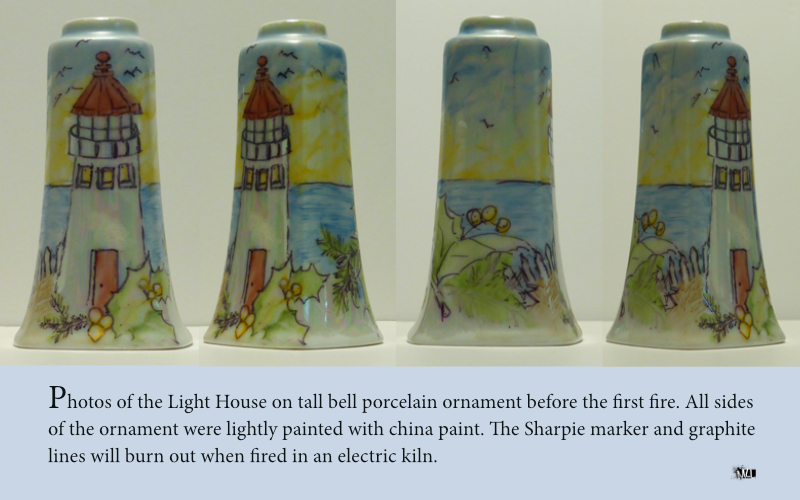
Here are few helpful and basic tips for transferring this design. I find that it is easier to transfer the design onto a three dimensional surface in small stages. First transfer the design onto the front of the ornament and then trace over the design with a Sharpie marker which prevents the graphite lines from rubbing off. Secondly, transfer the design onto the back of the ornament and go over the design with a Sharpie marker. You might notice some blank areas around the ornament. Fill in some of these blank areas around the ornament with design elements, such as, holly and berries. It is a good idea to draw the horizon line all the way around the ornament with your Sharpie marker. Horizon lines are usually straight where the water meets the sky.
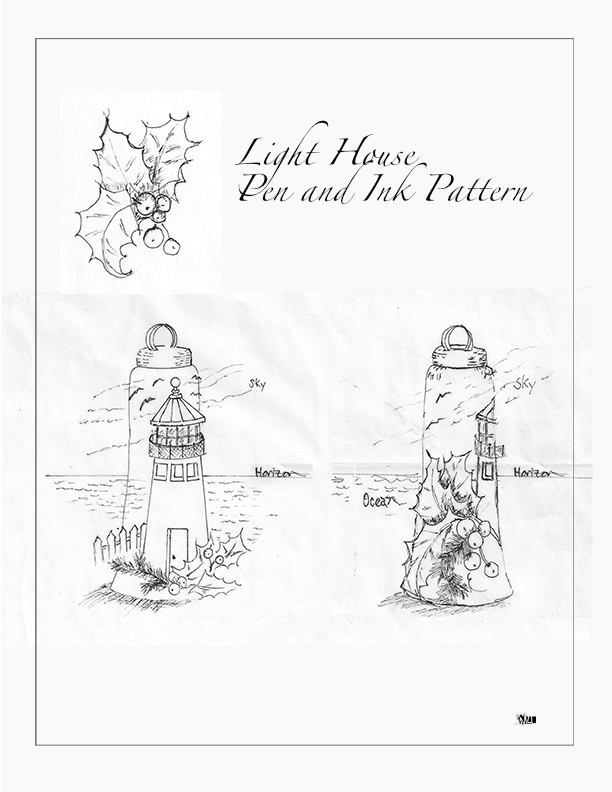
Scroll down to the bottom of this article to locate the pen and ink drawing that you can use to transfer the lighthouse drawing onto tracing paper.
Now let’s get started by placing a piece of tracing paper over the pen and ink drawing and tracing your design with a Sharpie marker. Another method used to transfer a drawing to tracing paper is to cut a piece of tracing paper to a letter size 8.5" by 11" sheet and place the tracing paper in your printer paper tray. Copy the pen and ink drawing onto the tracing paper.
Next, place a piece of graphite paper with the graphite side face down on the porcelain ornament. The graphite paper should be sandwiched in between the tracing paper and the porcelain ornament. Using a stylus or knitting needle, trace along the lines of the design. After you are finished, lift the tracing paper and graphite paper and review your design. At this point, you can use a Sharpie marker to fill in any areas that you might have missed. Also, you can go over the graphite lines with a Sharpie marker so that the lines are easier to see while you paint. You will see the marker and graphite in your paint, however, after firing in the electric kiln, the marker and graphite burns out of the china paint.
HAVE FUN PAINTING
MIXING THE PAINT
China paint is usually a powder mixture packed into clear plastic or glass vials. Pour a small amount of powder onto a grinding glass or a ceramic tile. Use an eyedropper or scoop a small amount of mineral oil onto your pallet knife and drop onto the china paint powder. Use the pallet knife to mix the paint. Mix thoroughly. Mix the paint to resemble the consistency of toothpaste. If the paint is too runny, add more powder. You can also scoop up paint that has too much oil and place it on newsprint.The newsprint absorbs the extra oil in the paint. Continue mixing the paint on the newsprint until the newsprint absorbs the oil. After your paint is well blended with the mineral oil, use your pallet knife to scrape the paint off of the tile or glass and transfer the paint mixture to your pallet.First Fire
Load a small #8 or #4 flat shader brush with Mixing Yellow and paint the surrounding area at the top of the light house.
Rinse your brush in brush cleaner and then gently press the brush on a paper towel or lint free cloth to blot out the brush cleaner. Dip your brush into mineral oil and blot with paper towel or lint free cloth. Use this cleaning method when you are getting ready to paint with another color. Now, reload your brush with Baby Blue and paint the ornament a darker shade at the top and paint a lighter layer of blue as you approach the horizon line. As a general rule, sky is painted darker at the top and lighter near the horizon line. Study some of the impressionist or realism paintings and you will see this technique is often used for painting the sky. Gently brush the blue to the edges of the previously painted yellow on your ornament being careful to avoid painting too far into the yellow. Refer to the above photograph to study how the yellow meets up with the blue on this painting.
First Fire
My reference photograph shows the ocean as a medium blue. I felt this was too dark for a first fire and used Baby Blue as a first layer of paint. Load a #4 or #8 flat shader brush with Baby Blue and paint strokes that follow the ocean horizon line. These strokes are painted horizontally, back and forth in horizontal straighter strokes that follow along the horizon line. Water looks more realistic if the strokes follow the horizon line. On a clear day, the value of the color decreases or appears darker near the horizon and lighter in the foreground.Light, weather and atmospheric conditions do influence the appearance of the horizon line and foreground colors. This painting is a general rendition based on one of my photographs and would look completely different at dusk or dawn or a stormy day. Often the line between sky and water look hazy. The horizon line isn’t usually a hard edge and often looks rather hazy, however, the painting strokes for the ocean do need to follow the horizon line.
First Fire
With your wipe out tool/clay shaper, gently wipe out some clouds. Clouds appear larger in the foreground and smaller at the horizon line. Smooth out your lines with a clean and oiled brush. Make sure to wipe back to the porcelain. By preserving the white porcelain background at this stage, you will achieve more realistic clouds later in the process.
First Fire
Paint a light coat of Pompadour Red onto the roof and door. The lines will fire out. These can be reapplied and shaded later. Right now they are general guidelines.
First Fire
Coat with Mixing Yellow. Wipe out a highlight on some berries. You will barely be able to see the highlights at this time, however, they will be more noticeable later on in the process.
First Fire
Paint the general shape of the fir boughs Sap Green. At this time, these shapes will appear like blobs rather than finely shaped branches. Later in the process, they will look more like fir boughs. Paint the holly leaves Sap Green with a little Mixing Yellow here and there. Blend the edges of the Sap Green and Mixing Yellow colors. Show a separation between the leaves by painting a small amount of Brown Green along the edges of the painting where the leaves overlap. The leaves and boughs will be more defined on the second fire painting.
First Fire
I chose to leave the rickety weathered fence white at this time. Later I will add some grayish tones to enhance the weathered look. The best thing to do for this area is to paint behind the fence which is the ocean. Painting in the background behind the fence will help the fence maintain its shape. Also paint in the greenery, shrubs etc around the fence.
First Fire
Use a fine tip calligraphy pen and grey ink to outline the windows. Leave the window area unpainted for now.
First Fire
Using a fine line calligraphy pen or a small round brush, lightly paint grey lines for the windows and rail below the roof of the light house. On the concrete you can outline the window inset with a light gray loaded on a small flat brush. This area should be painted as lightly as possible and then darkened later in the process. These are the lower three windows encased in concrete. If I were to paint this ornament again, these windows would be removed from the design. Old structures experience architectural changes over time. The original photograph shows the lower windows as openings that were sealed off with concrete. In a small painting these windows can be omitted and the light house would be easier to paint.
Firing the Ornament
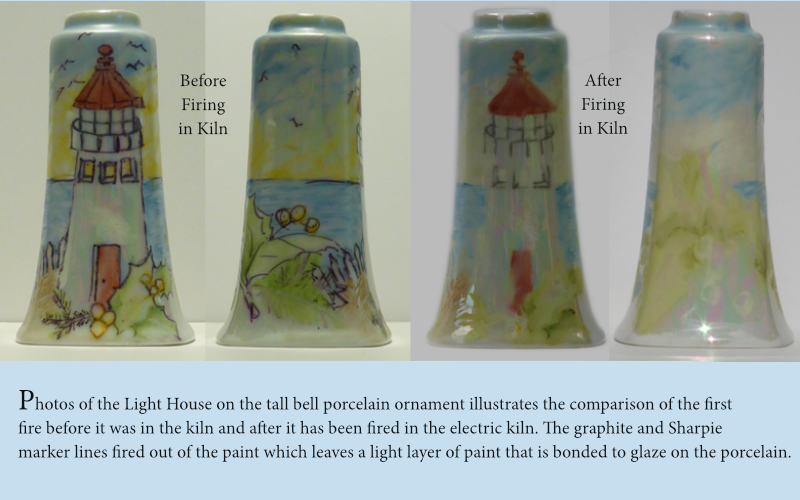
Fire at Cone 015 or Cone 014. Do not fire the metal ornament hanger as it will melt in the kiln.
The photograph above shows the painted ornament before it is placed in the kiln and a view of the ornament after a first fire. Notice how the graphite and Sharpie marker lines have fired out of the painting which left a light layer of china paint which serves as a base layer of paint and is used as a guide for building up future layers of paint. China painters usually paint a light layer onto the porcelain and build up the paint by firing after each light application.
SECOND FIRE INSTRUCTIONS FOR LIGHTHOUSE ORNAMENT (In Progress Instructions)
Second Fire Notes
I am posting the second fire instructions as each step of the artwork is completed.
PREPARATION
Second Fire Preparation
Some porcelain artists sand their paintings with a fine grit wet/dry sand paper. I tend to skip the sanding step. To sand or not to sand is a personal preference.
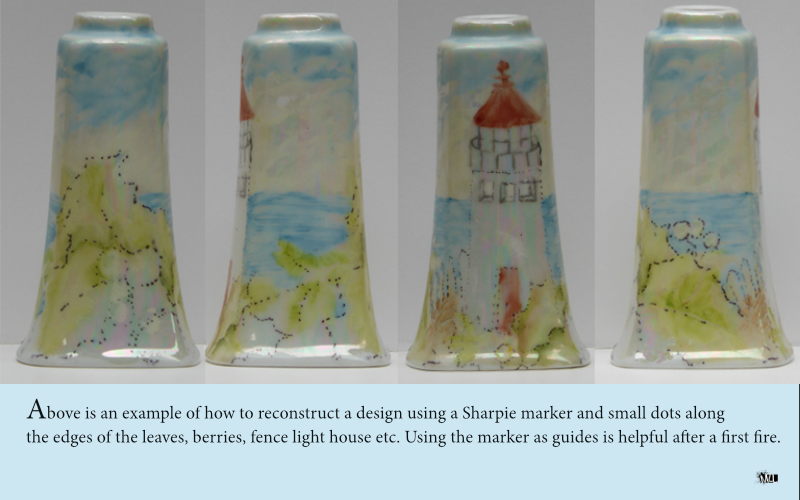
After a first fire, some of the elements can appear very light. I like to reconstruct the painting by using a Sharpie marker. First place little dots along the elements that can be seen and then reconstruct more elements that seem a too light. Refer to your original drawing as you define the elements in your design. A magnifying glass is helpful at this stage as well. This technique works good after a first fire. You will be able to skip this step later on because your fired paint will be darker later in the process. Below is a photo that shows how this technique appears after reconstructing with a marker.
Second Fire
Load a small #8 or #4 flat shader brush with Mixing Yellow and paint the surrounding sky at the top of the light house, including the windows and rail. The sky would read as a sunset through the windows at dusk. Mixing Yellow is painted on the lower story windows to make the light house appear lighted from the inside.
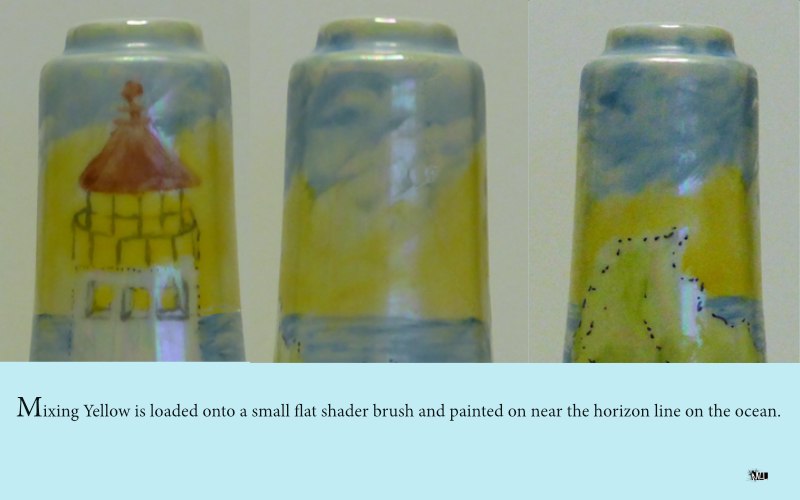
Next mix Pompadour Red with Mixing Yellow to make a shade of orange. Lightly paint the orange mixture nearer to the horizon. Leave the Mixing Yellow exposed above the orange for a showy sunset. Use the photograph collage below as a guide for the orange paint.
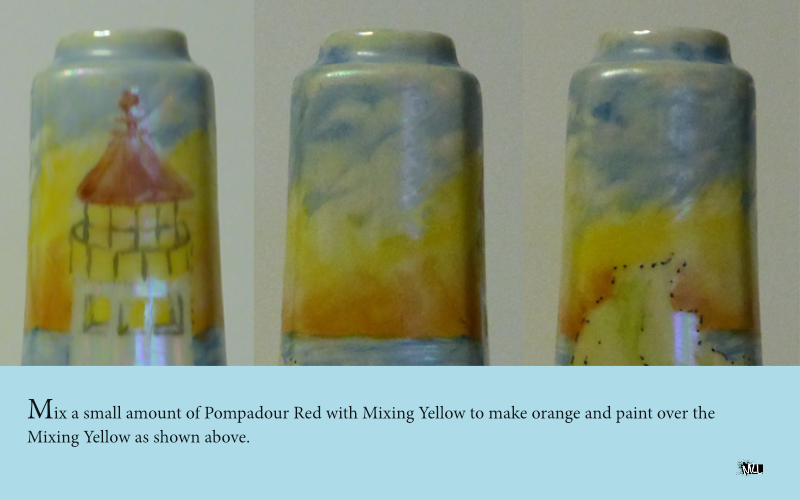
Painting instructions for the remainder of this lesson are under construction. As each step is completed, I will post the instructions. Next step will be the the roof and door on the light house. Thank you for your patience.
Below is the pen and ink drawing that can be used for painting the light house.
E-mail: 💌 marylou@maryloulaberge.com