

GENERAL SUPPLY LIST
|
|
|
PREPARATION
CLEAN THE PORCELAIN ORNAMENT
Remove the metal hanger from the ornament. Apply denatured alcohol or glass cleaner to the ornament and wipe off with a clean lint free cloth. Old sheets, t-shirts and industrial strength blue paper towels are suitable lint free choices for cleaning porcelain.
THE DESIGN
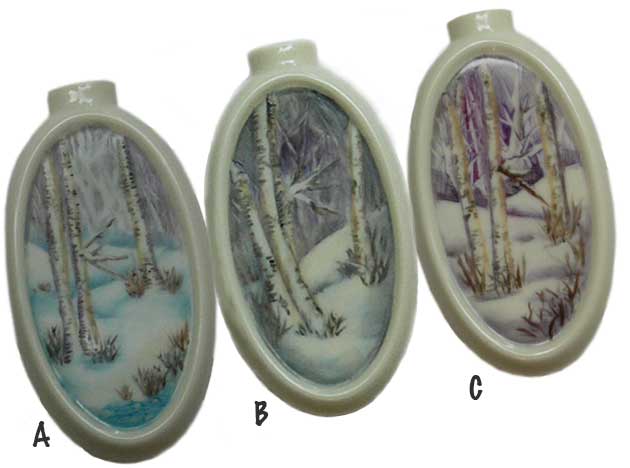
You can draw the main elements of a landscape onto the surface using a fine line permanent marker (Sharpie) or a black china marker. In this case, a horizon line was established first. Because these are forest scenes with snow drifts, the horizon line is not totally straight. However, if there is a stream or pond, the line where water sits is relatively flat a horizontal line is established for the area where water sits or flows. Example (A) above has a small body of partially frozen creek water on the lower part of the ornament. This is painted with horizontal strokes. Place a vertical line where you would like your Birch trees. On these designs the trees are placed to appear in the foreground and middle ground of the design for interest. The trees in the background were painted freehand.
HAVE FUN PAINTING
MIXING THE PAINT
China paint is usually a powder mixture packed into clear plastic or glass vials. Pour a small amount of powder onto the grinding glass or a ceramic tile. Use an eyedropper or scoop a small amount of mineral oil onto your pallet knife and drop onto the china paint powder. Use the pallet knife to mix the paint. Mix thoroughly. If the paint is too runny, add more powder. You can also scoop up paint that has too much oil and place it on newsprint. The newsprint absorbs the extra oil in the paint. Continue mixing the paint on the newsprint until the newsprint absorbs the oil. After your paint is well blended with the mineral oil, use your pallet knife to scrape the paint off of the mixing tile and transfer the paint mixture to your pallet.
The background colors are blended into each other on all three designs.
Second Fire
(A) Cool Shadow is painted in the snow drift area.
(B) Persian Gray is painted on the horizon line along the background snow drift.
(C) Paint Black Grape along the background snow drift.
Second Fire
The idea on the second fire in the background is to create a feeling of a dense forest. You can accomplish this by adding a layer of paint along the horizon line along the shrubs in the lower part of the background. Smooth and blend the paint for a more natural shadowy feeling at the base of the forest. Below are the colors used in the above samples.
(A) Cool Shadow is painted along the lower part of the forest shrubbery. Brush and blend the top part of this area which gives the illusion of a foggy or dense area within the forest.
(B) Using a shader brush loaded with a mixture of Black Grape and Persian Grey brush the paint onto the lower forest area behind the first snow drift.
(C) American Beauty and Persian Grey is applied to the the lower forest behind the snow drifts using the same method as described above on (B)
Snow drifts are generally smoother. They look more realistic if they are painted smooth and rolling rather than clumpy like cotton balls.
First Fire Second Fire First Fire Second Fire First Fire Second Fire Firing the Ornament Fire at Cone 014 on both fires. Do not fire the metal ornament hanger as it will melt in the kiln. E-mail: 💌 marylou@maryloulaberge.com
Great snow colors are Persian Gray or Cool Shadow or a middle value blue. The colors you choose will set the tone or the scene. Using a clean shader brush wipe the snow off the top of the drift and pull the paint down into the crevice between the snow drifts.
Mix a little color that is used in the background behind the trees with the color used in the snowdrift to create a grayish mixture that will deepen the crevice which adds depth to the snow drifts.
On the first fire the Birch trees were wiped out with clean brushes or a wipe out tool. Then the shadow side of the tree was painted with Black Grape and the reflected light side of the tree was painted with Yellow Brown. The texture of the Birch tree was painted with gray by using a small round brush to create the small lines on the white bark.
Then the shadow side of the tree was darkened with Black Grape and the reflected light side of the tree was painted with Yellow Brown, if needed. The texture of the Birch tree was painted again with Gray by using a small round brush to create the small lines that show here and there on the white bark.
Load a liner brush or scrolling brush with a gray and brown and paint thin branches around the base of the the trees. Keep in mind that the brush in the foreground is a bit larger than the brush on the middle ground tree and the background areas. If desired Use a wipe out tool or a clean stiff brush to wipe out small areas of snow on the branches.
Load a liner brush or scrolling brush with a gray and brown and darken areas of the brush around the trees. Keep in mind that the brush in the foreground is a bit larger than the brush on the middle ground tree and the background areas. If desired, use a wipe out tool or a clean stiff brush to wipe out small areas of snow on the branches.
© 2010-2021 Mary Lou LaBerge